Create Rest Api In Laravel
Hello Guys,
Today we will learn how to create a rest API using laravel. Apis is mainly used in mobile applications. Laravel helps us to create the API faster and easier way.
Let's start developing the rest API in details steps.
Steps to create rest API in the laravel
Step 1: Install Laravel
Our first step is to install the laravel. To install laravel we can use multiple options. we will use composer to install laravel. Run the following command in your terminal or command prompt.
composer create-project laravel/laravel rest-api
Step 2: Database configuration
After installing laravel, We need to configure the project to the database. we can complete are database configuration by changing the following in the .env file.
DB_CONNECTION=mysql
DB_HOST=127.0.0.1
DB_PORT=3306
DB_DATABASE=laravel-api
DB_USERNAME=root
DB_PASSWORD=password
Step 3: Create migration file
Now we need to create a migration file to create a table in the database. I will create a posts table to use in our API. Let's create a migration file by following the artisan command in our terminal or command prompt.
php artisan make:migration create_posts_table
After running the file, a new file will be created in the database/migration folder. You can check the code below. we also need to create the fields/columns for the database table.
use Illuminate\Database\Migrations\Migration;
use Illuminate\Database\Schema\Blueprint;
use Illuminate\Support\Facades\Schema;

class CreatePostsTable extends Migration
{
    /**
     * Run the migrations.
     *
     * @return void
     */
    public function up()
    {
        Schema::create('posts', function (Blueprint $table) {
            $table->id();
            $table->string('title', 255)->nullable();
            $table->string('slug')->nullable();
            $table->text('body')->nullable();
            $table->timestamps();
        });
    }

    /**
     * Reverse the migrations.
     *
     * @return void
     */
    public function down()
    {
        Schema::dropIfExists('posts');
    }
}
Now, run the following command to create the table in the database.
php artisan migrate
Step 4 : Create Controller and Model
Once, Our project is connected to the database. Now we need to create a controller and model in the laravel to manage our API. Let's create the controller and model by running the following command.
php artisan make:controller PostController --resource –model=Post
After running the command 2 new files will be created in the following paths.
“app/Http/Controllers/BlogController.php”
“app/Models/Blog.php”
BlogController is a resource-type controller. which will create the default 7 methods in the controller file.
The methods are below.
- index()
- create()
- store()
- show()
- edit()
- update()
- destroy()
Let's have a look at the app/Http/Controllers/BlogController.php file and updates as below.
namespace App\Http\Controllers;

use App\Models\Post;
use Illuminate\Http\Request;

class PostController extends Controller
{
    /**
     * Display a listing of the resource.
     *
     * @return \Illuminate\Http\Response
     */
    public function index()
    {
        $posts = Post::latest()->paginate(15);
        return [
            "status" => 1,
            "data" => $posts
        ];
    }

    /**
     * Show the form for creating a new resource.
     *
     * @return \Illuminate\Http\Response
     */
    public function create()
    {
        //
    }

    /**
     * Store a newly created resource in storage.
     *
     * @param  \Illuminate\Http\Request  $request
     * @return \Illuminate\Http\Response
     */
    public function store(Request $request)
    {
        $request->validate([
            'title' => 'required',
            'body' => 'required',
            'slug' => 'required',
        ]);

        $post = Post::create($request->all());
        return [
            "status" => 1,
            "data" => $post
        ];
    }

    /**
     * Display the specified resource.
     *
     * @param  \App\Models\Post  $post
     * @return \Illuminate\Http\Response
     */
    public function show(Post $post)
    {
        return [
            "status" => 1,
            "data" =>$post
        ];
    }

    /**
     * Show the form for editing the specified resource.
     *
     * @param  \App\Models\Post  $post
     * @return \Illuminate\Http\Response
     */
    public function edit(Post $post)
    {
        //
    }

    /**
     * Update the specified resource in storage.
     *
     * @param  \Illuminate\Http\Request  $request
     * @param  \App\Models\Post  $post
     * @return \Illuminate\Http\Response
     */
    public function update(Request $request, Post $post)
    {
        $request->validate([
            'title' => 'required',
            'body' => 'required',
            'slug' => 'required',
        ]);

        $post->update($request->all());

        return [
            "status" => 1,
            "data" => $post,
            "msg" => "Post updated successfully"
        ];
    }

    /**
     * Remove the specified resource from storage.
     *
     * @param  \App\Models\Post  $post
     * @return \Illuminate\Http\Response
     */
    public function destroy(Post $post)
    {
        $post->delete();
        return [
            "status" => 1,
            "data" => $post,
            "msg" => "Post  deleted successfully"
        ];
    }
}
Step 5: Add Resource Route
For Laravel Rest API next, we need to add a resource route for the Post crud application.
So open your “routes/api.php” file and add the following route.
use App\Http\Controllers\PostController;
Route::resource('posts', PostController::class);
Step 6: Run application
After all the steps, We can run the application by running the serve command.
php artisan serve
Final Step: Testing
After serving the application, We need to test our project. We can test our project in the postman.
Create Post

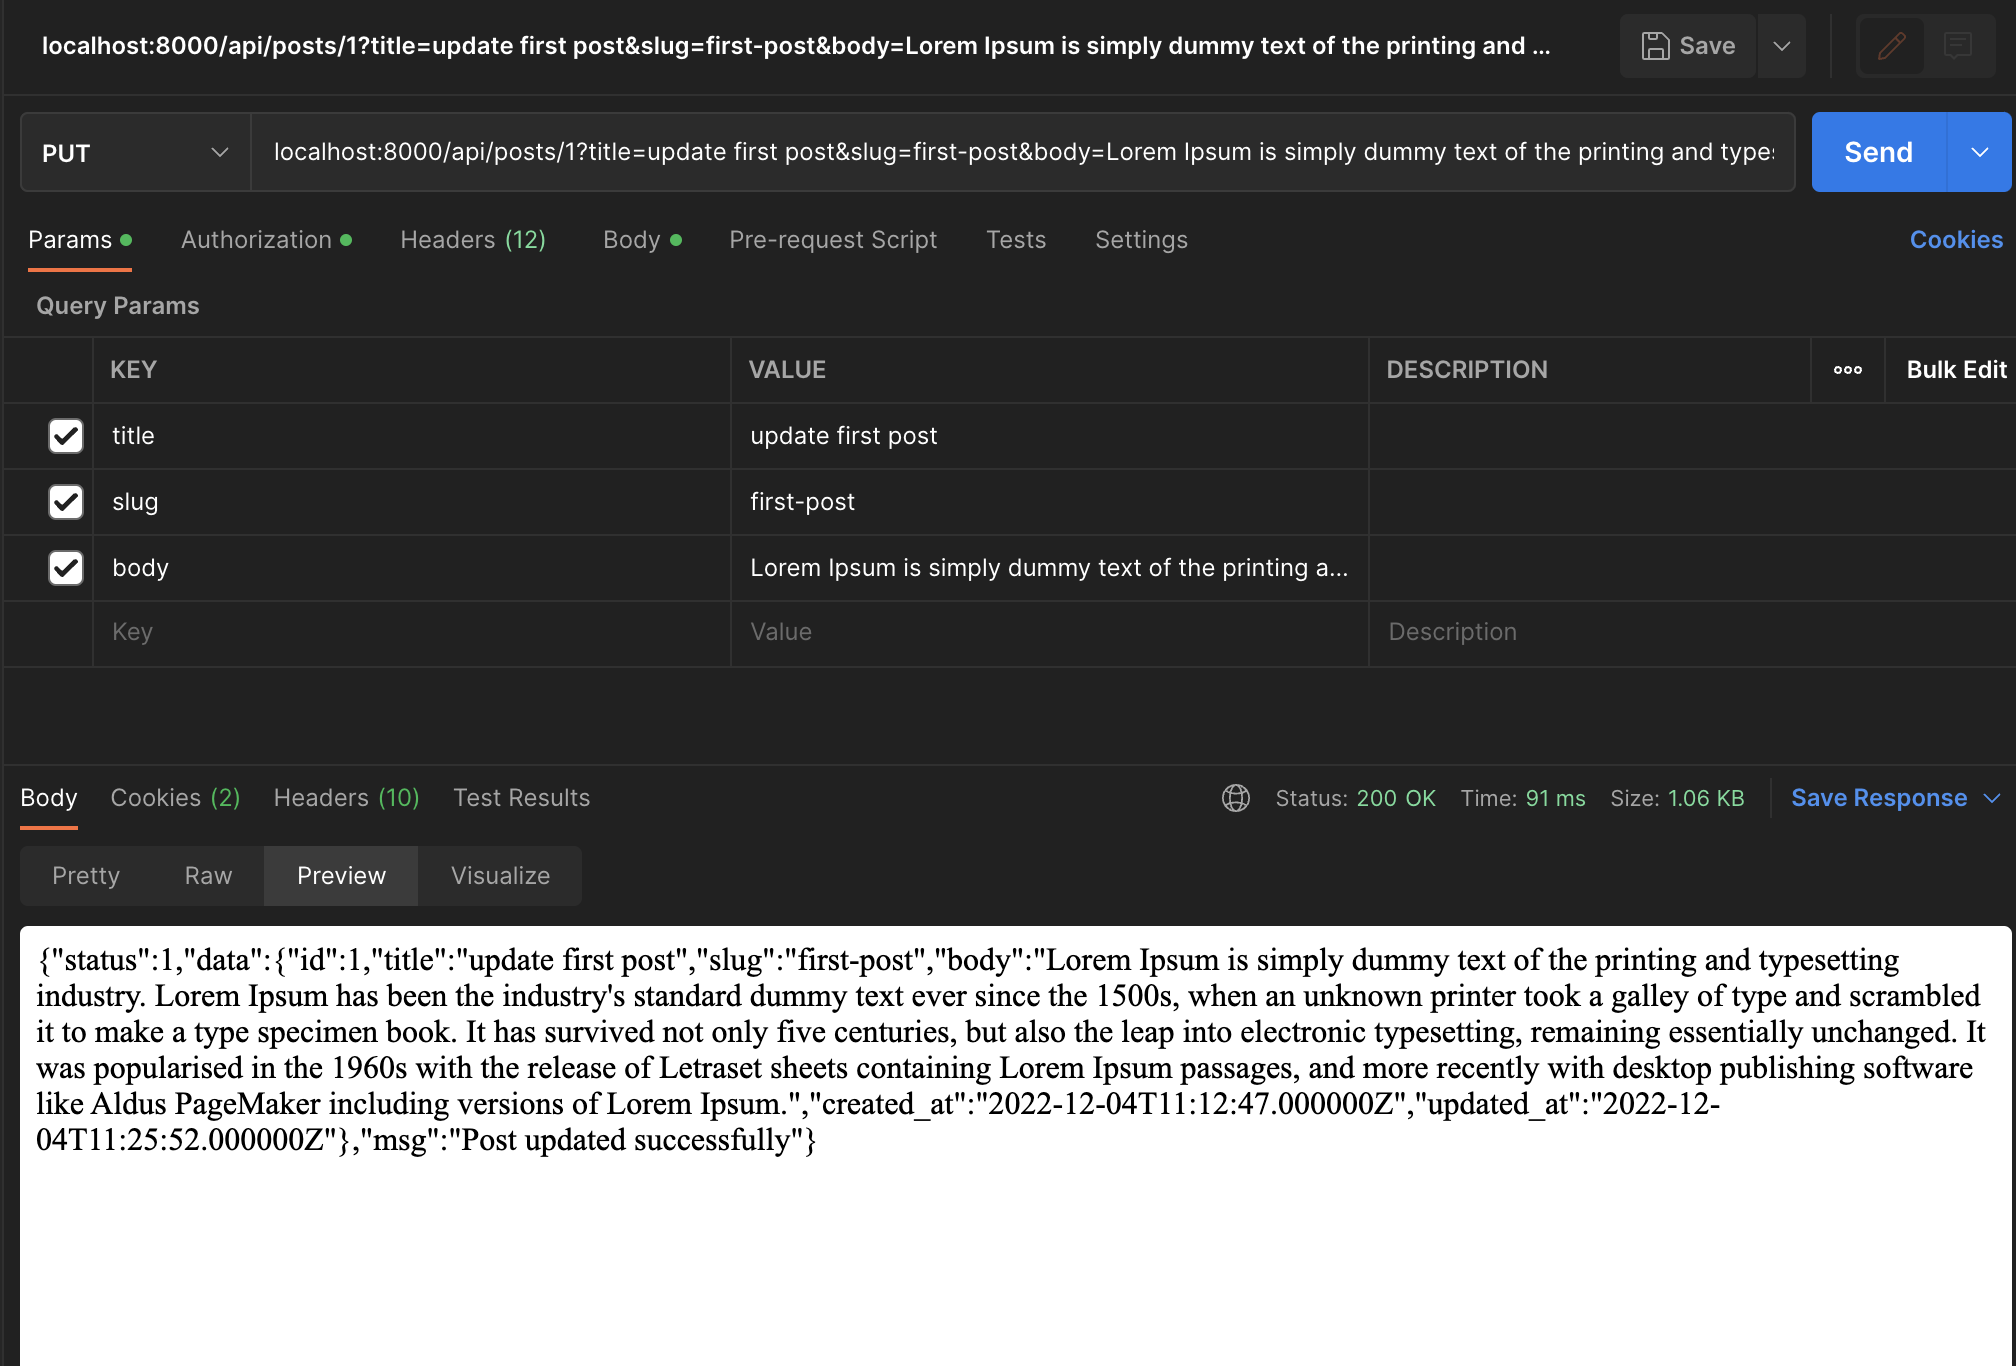
Update Post
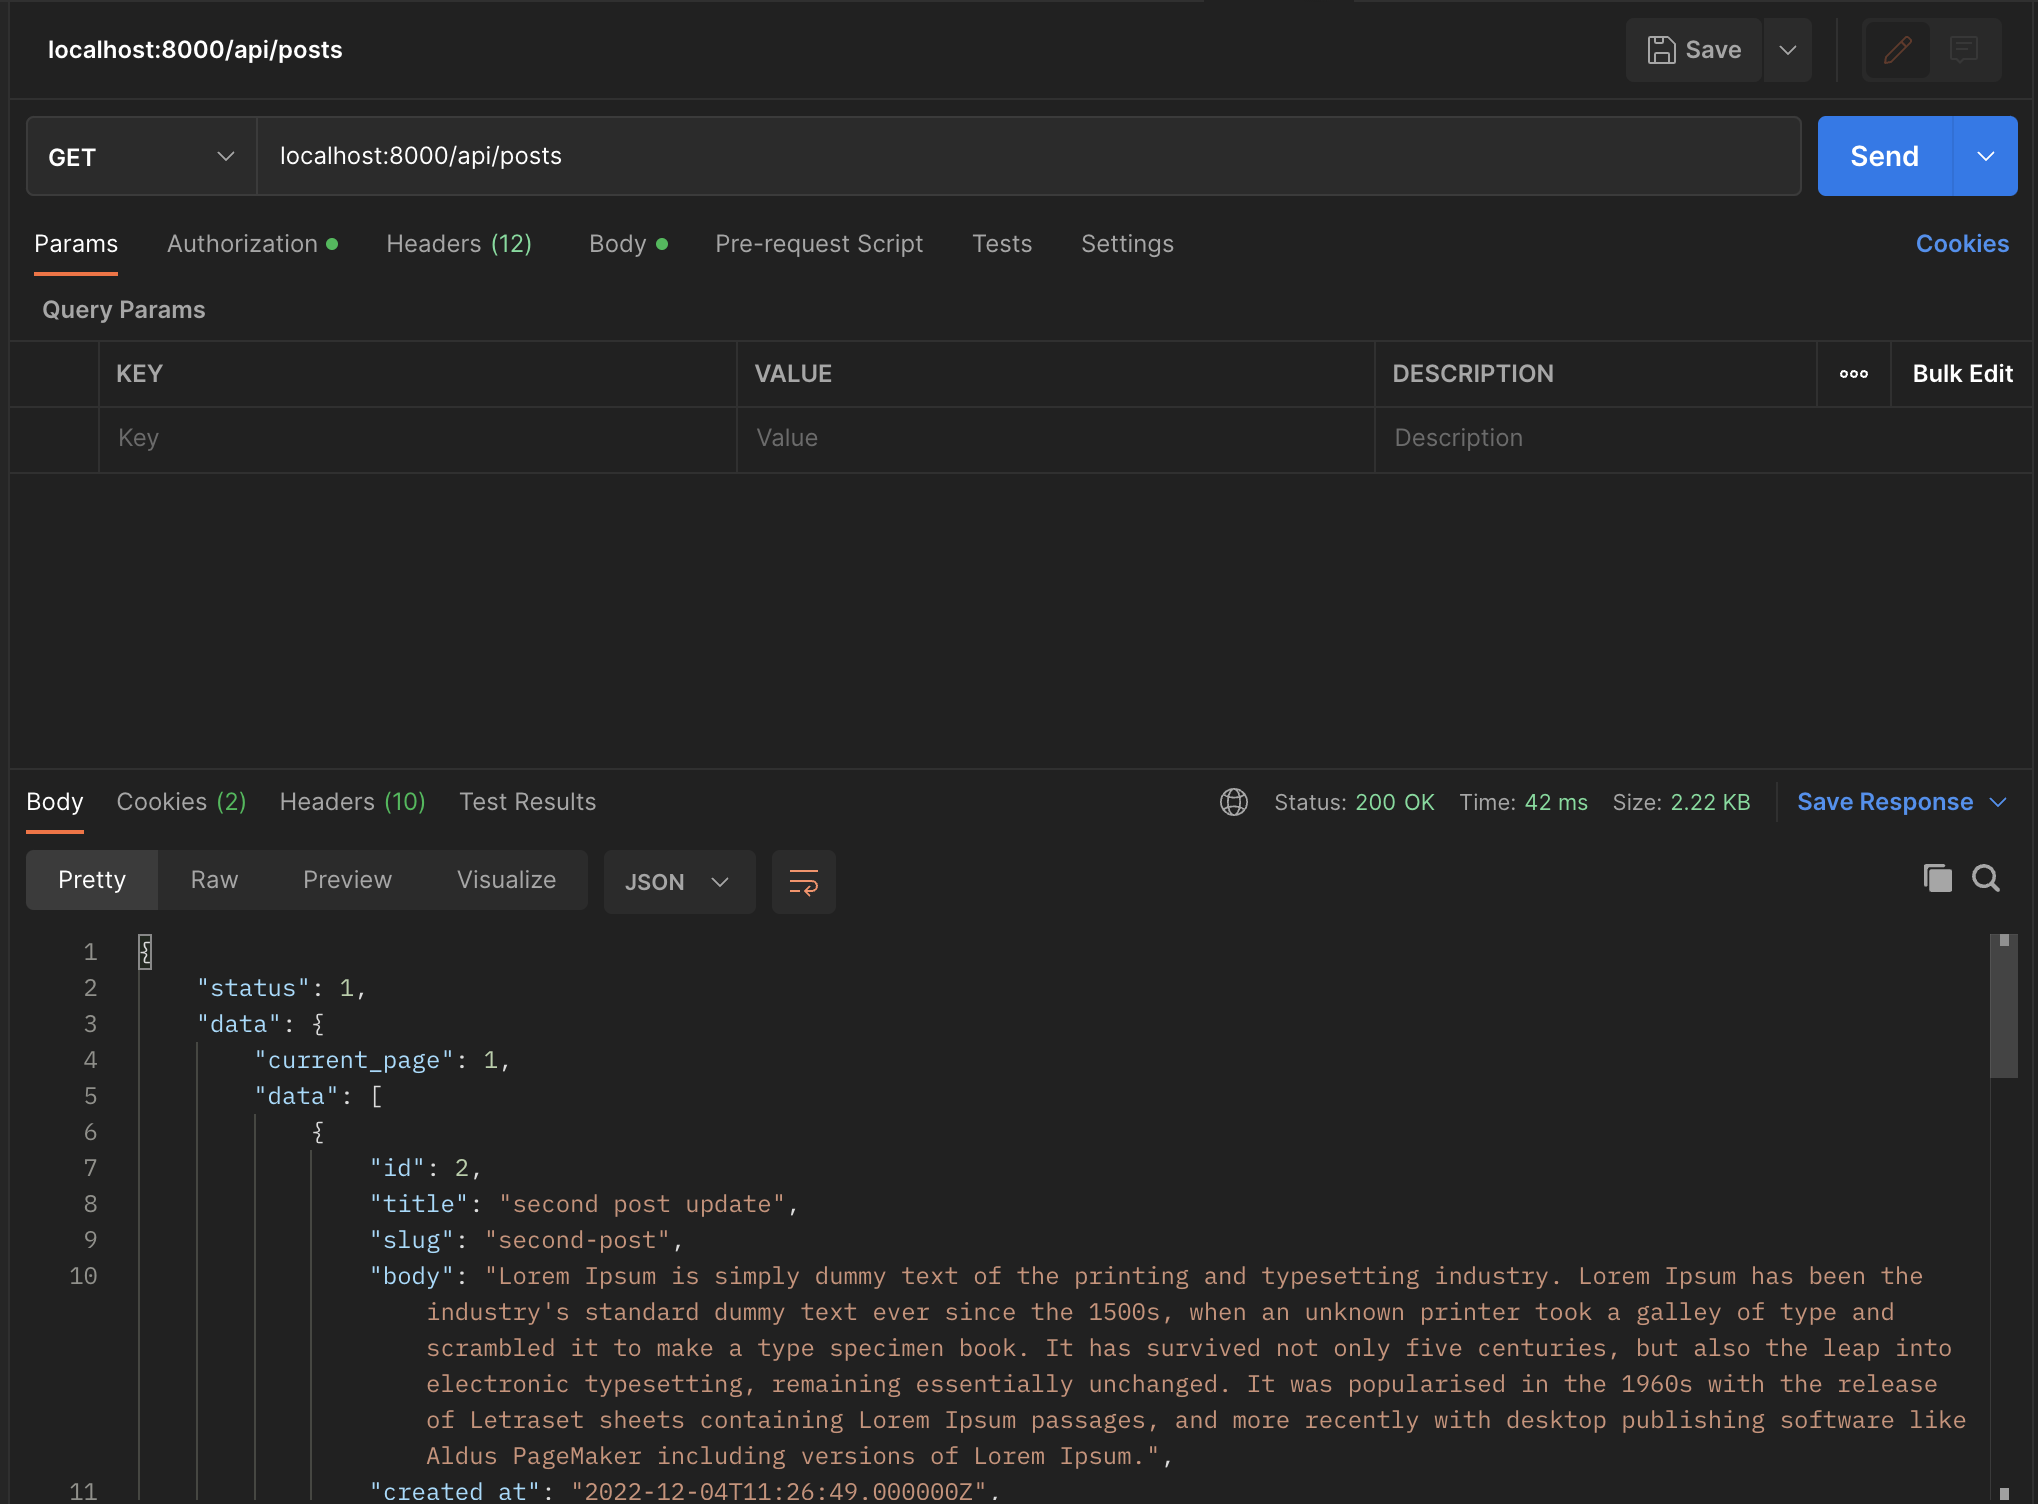
Get all post
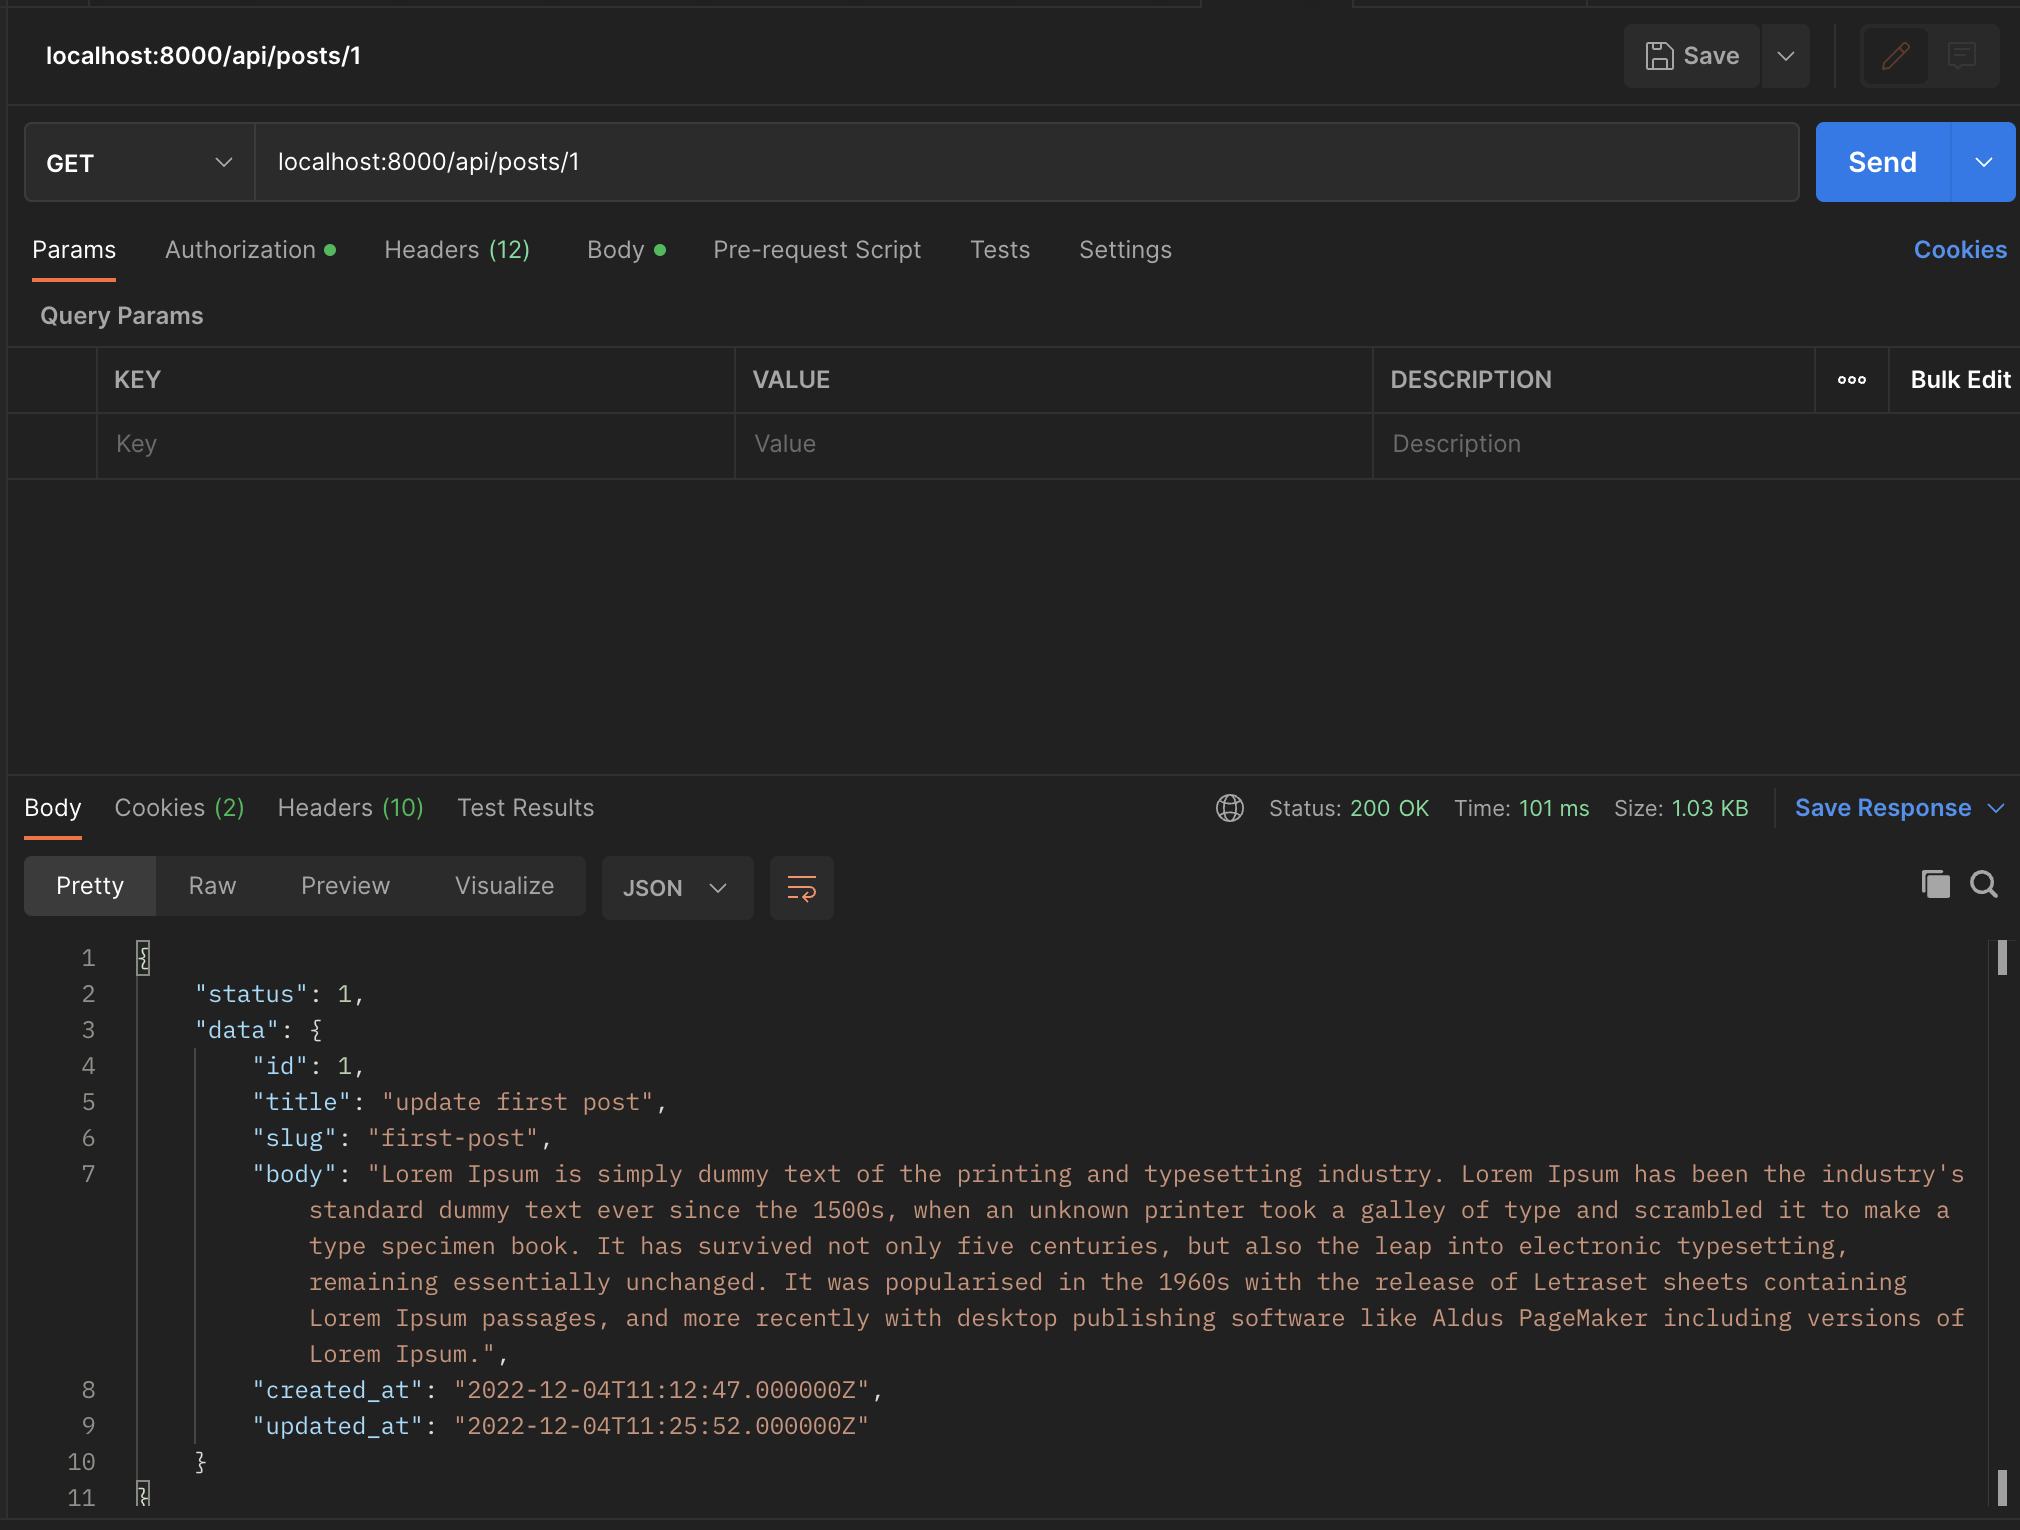
Get single post
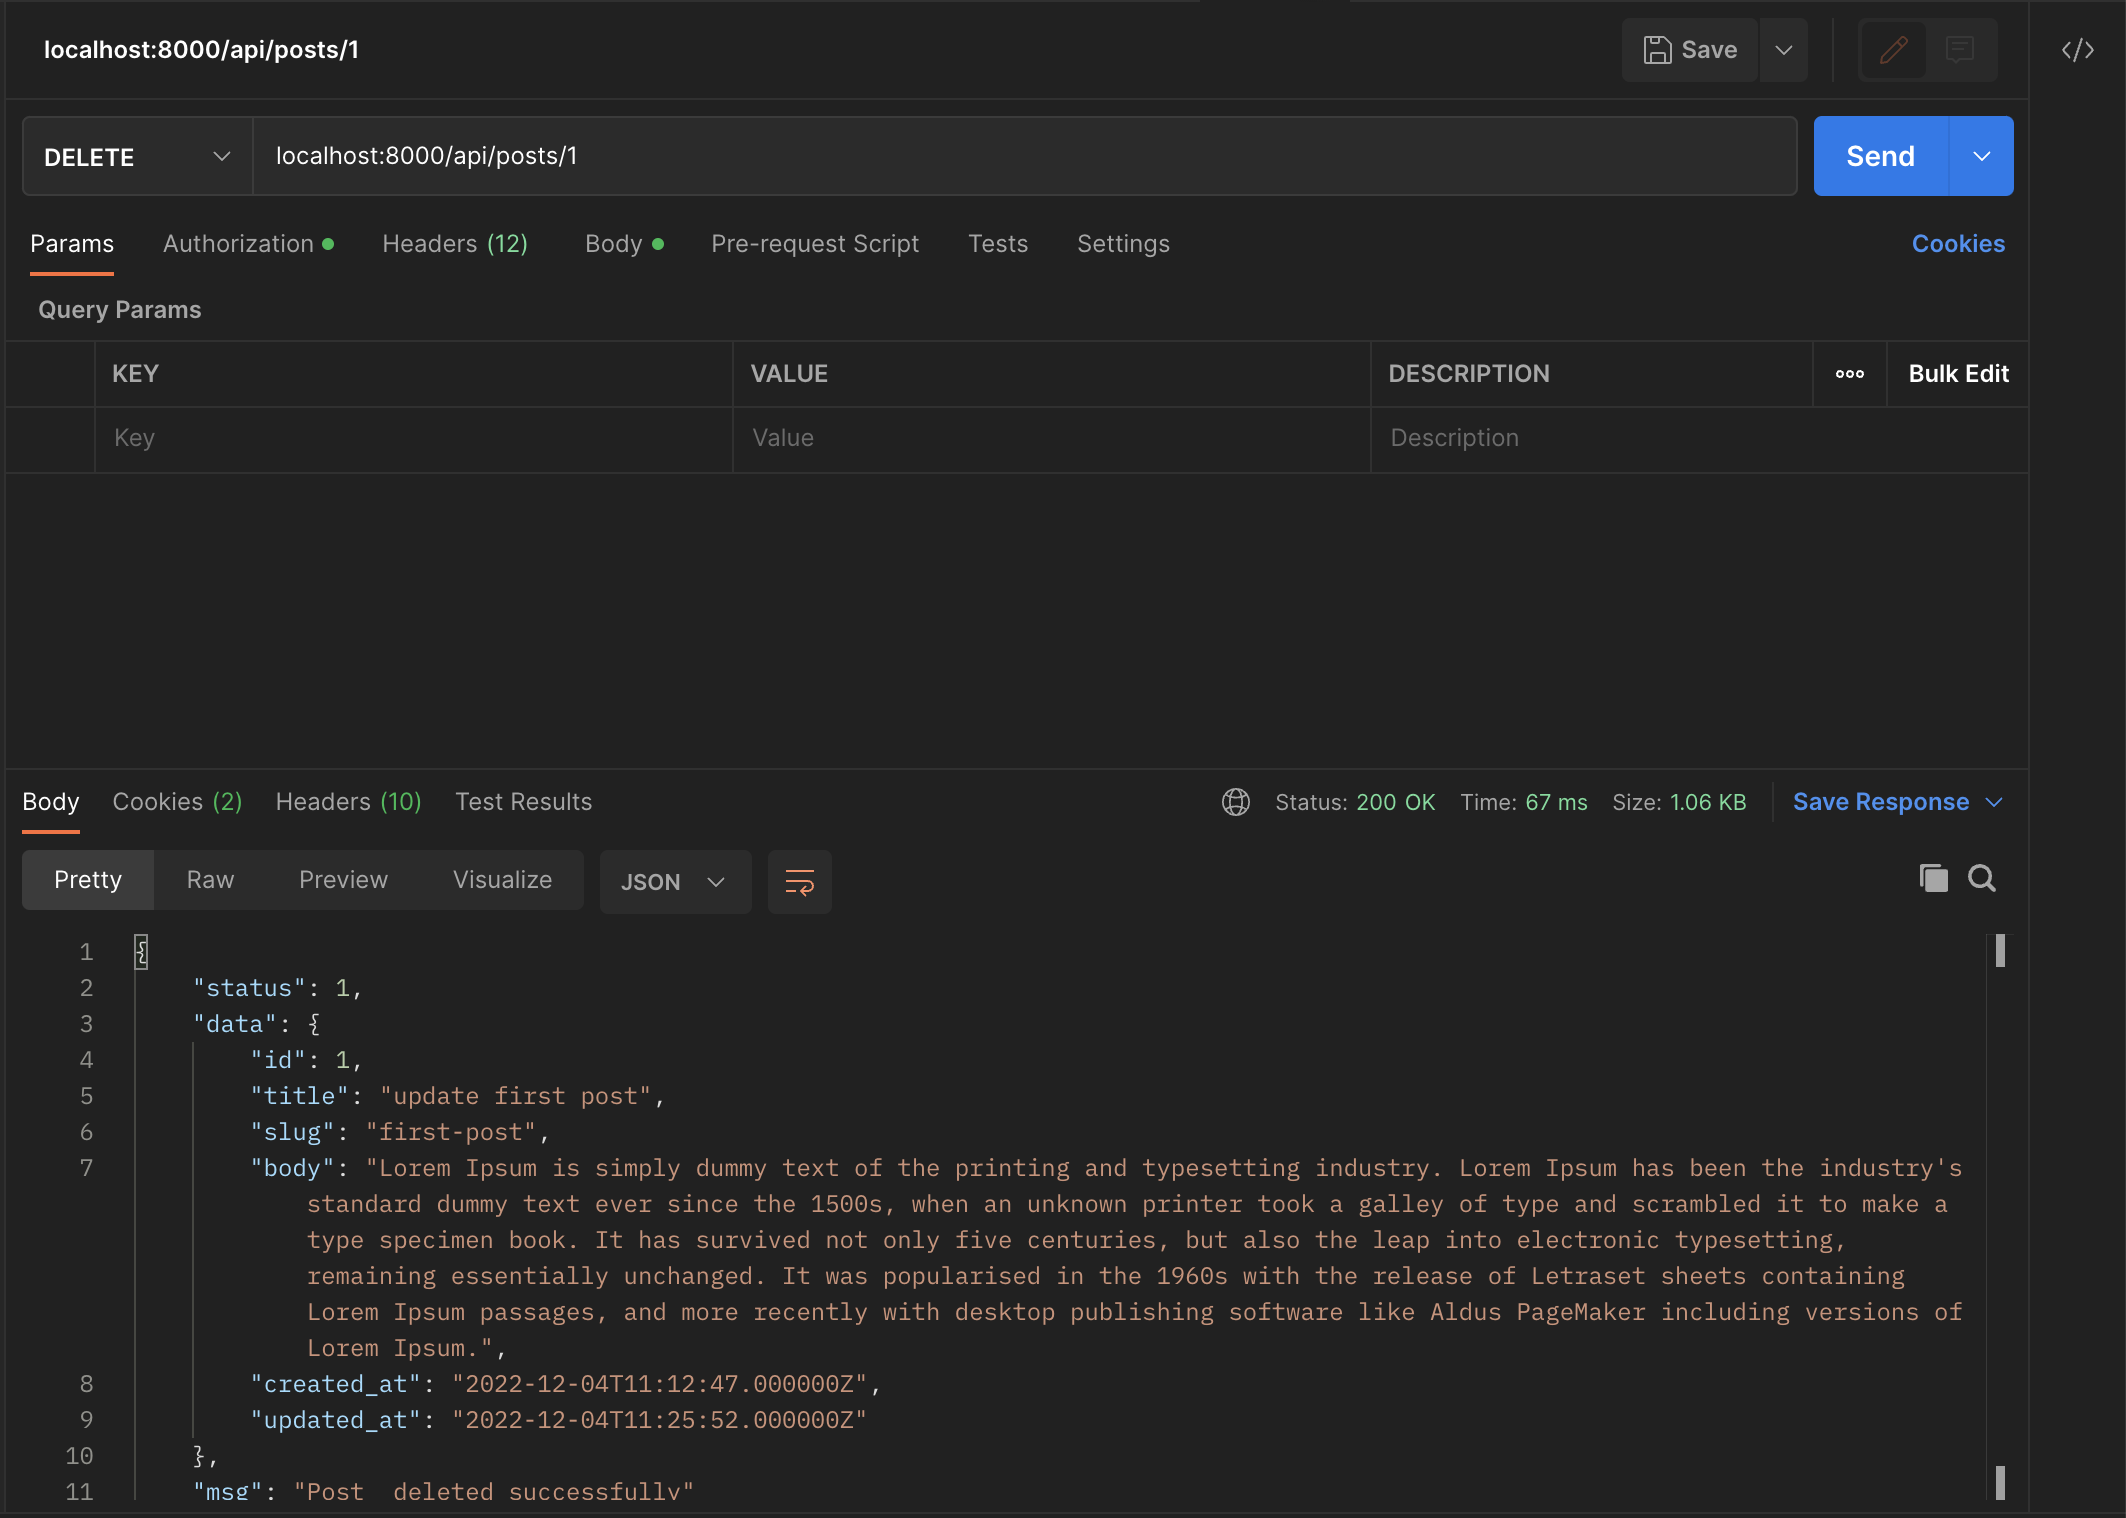
Delete Post
I hope this post is helpful to you. You can share this post with your friends and team. You can suggest me next topic for the post.
Thanks.

Templatebench
We are Template bench. We love programming. We also love to share tips and tricks with you.